RDAF Geo-DR Administrator Guide
Introduction
RDAF Geo-DR leverages ZFS snapshot-based replication to provide a robust Disaster Recovery (DR) solution between a Primary Site and a Secondary Site.
Unlike traditional application-level replication, the RDAF ZFS DR framework operates at the storage layer, continuously replicating datasets associated with critical platform services such as:
- MariaDB
- Kafka
- MinIO
- OpenSearch
- GraphDB
- External OpenSearch (Optional)
High-Level Architecture
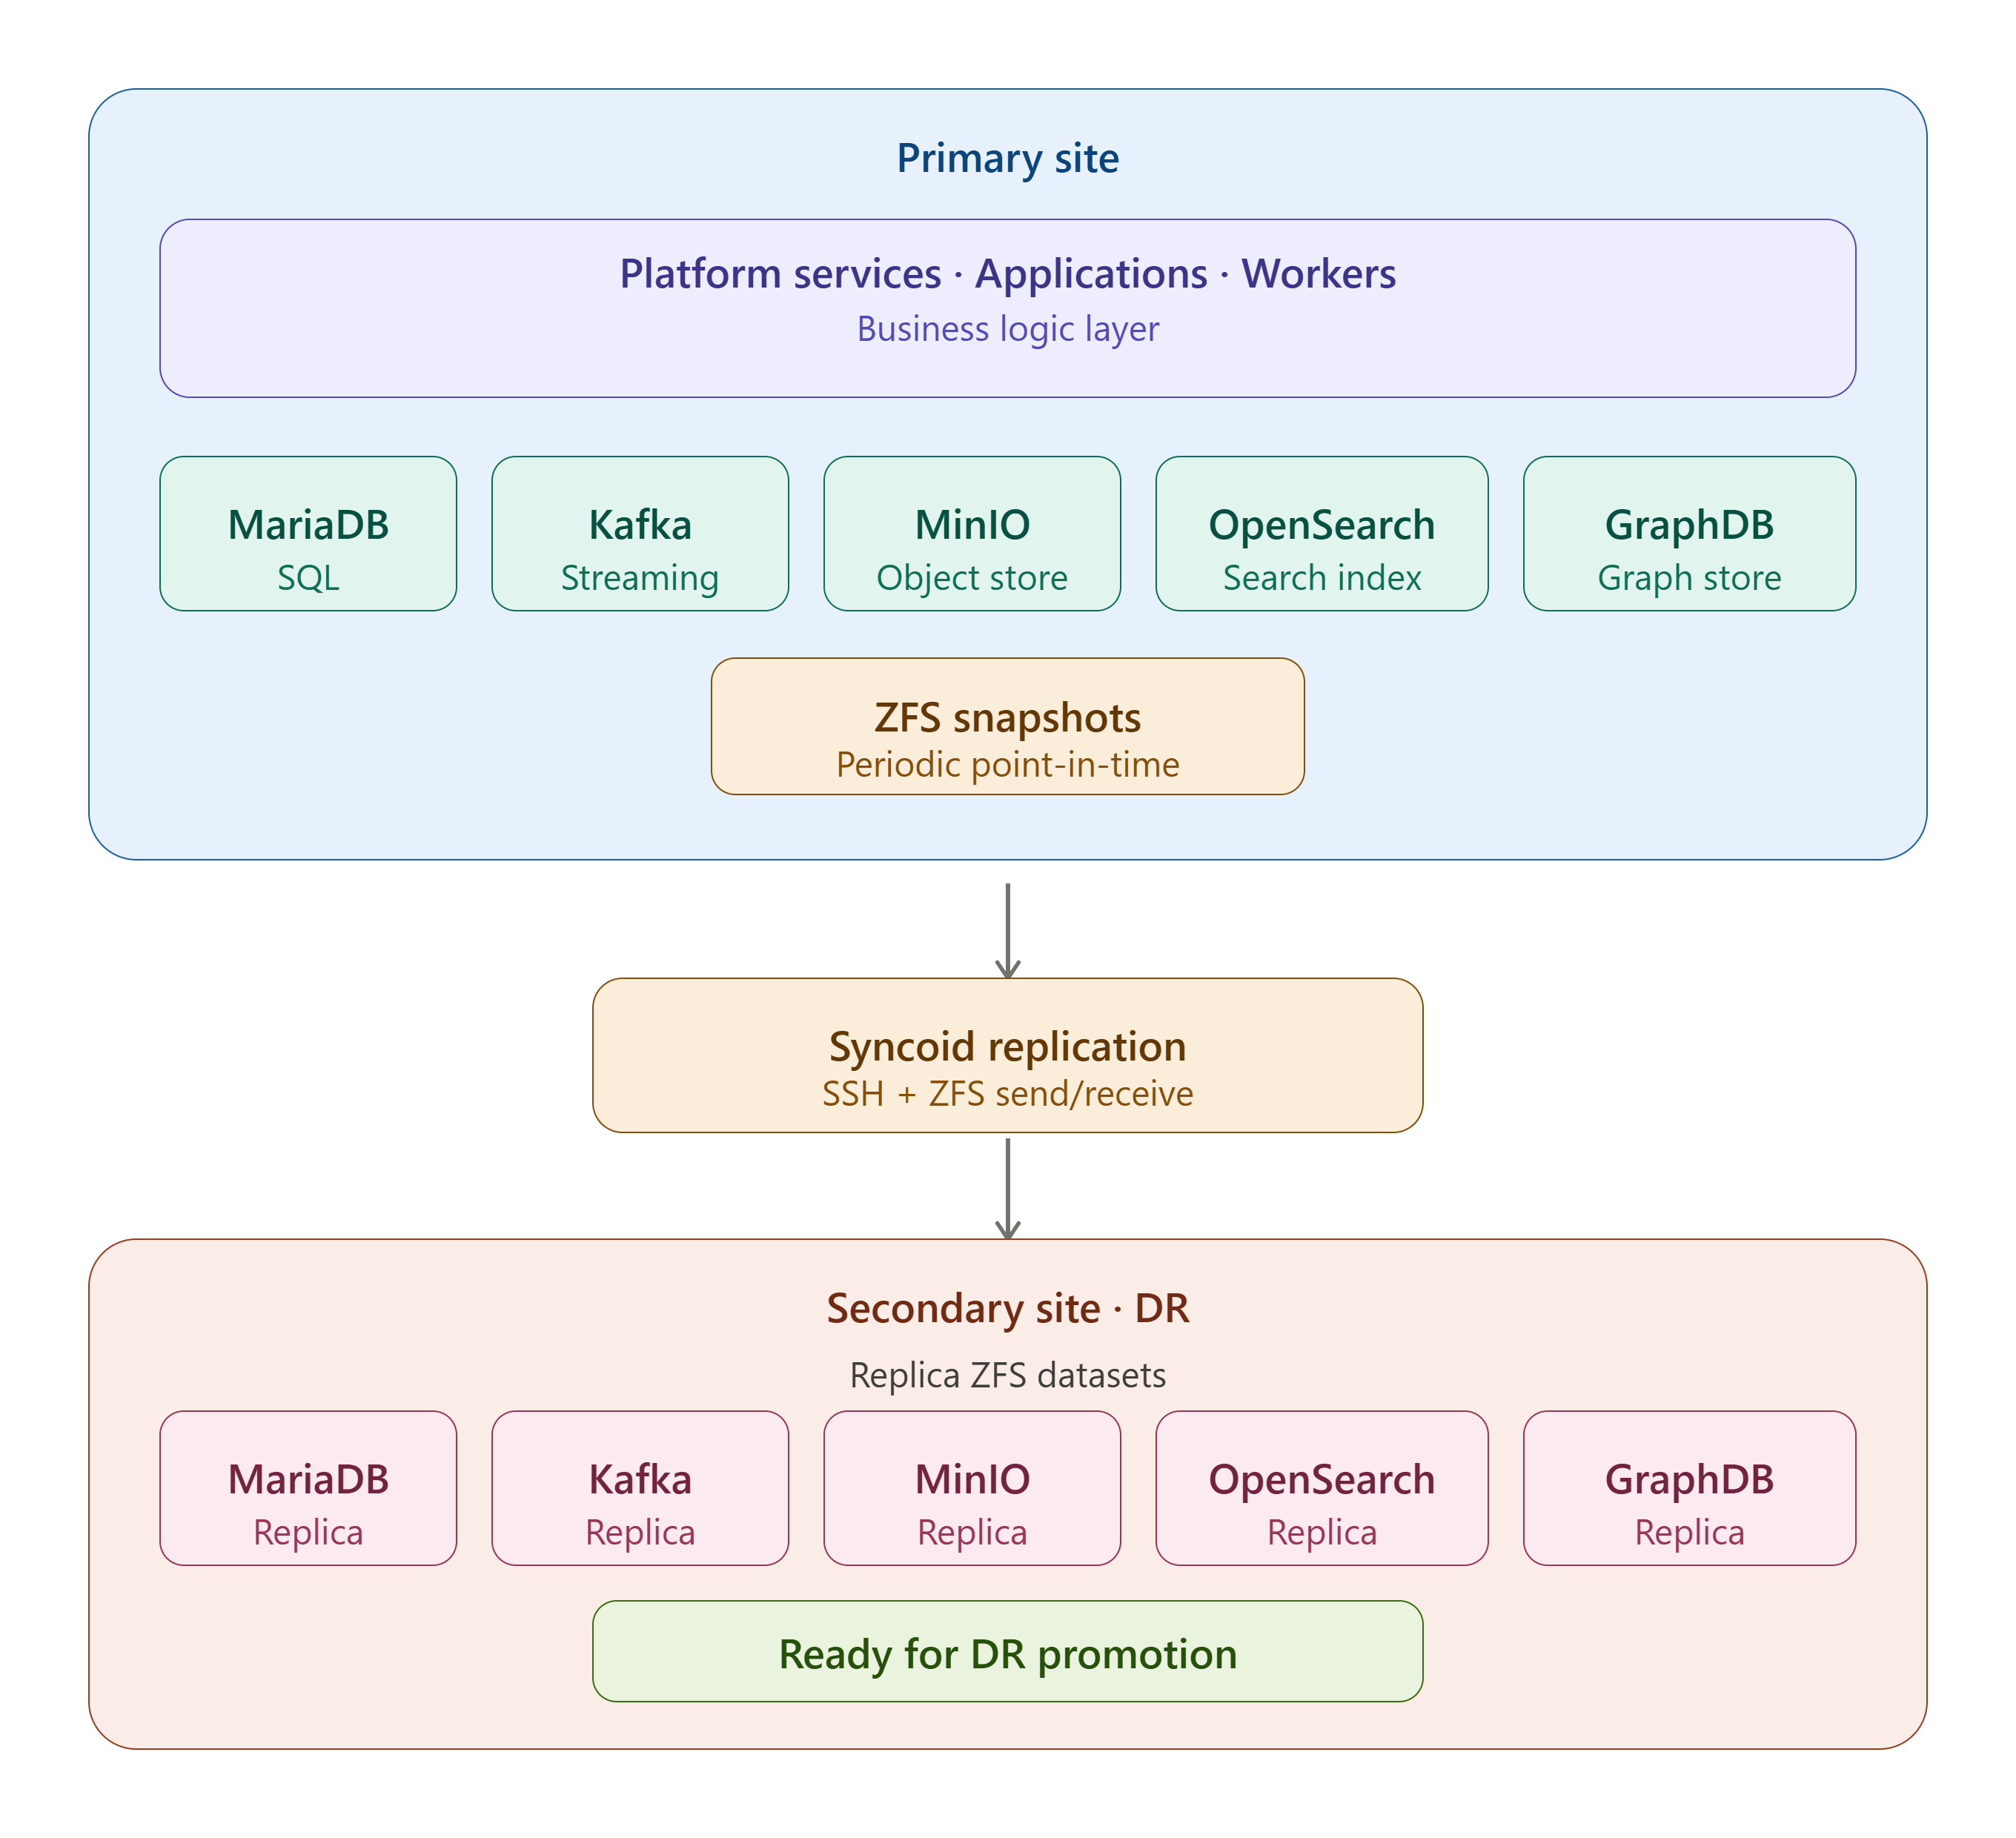
1. Prerequisites
1.1 Sample Environment
1.1.1 Primary Site
| Component | Hosts |
|---|---|
| HAProxy VIP | 192.168.107.229 |
| Infra Services | 192.168.107.230, 192.168.107.231, 192.168.107.232, 192.168.107.233 |
| Platform Services | 192.168.107.230, 192.168.107.231 |
| Application Services | 192.168.107.232, 192.168.107.233 |
| Workers | 192.168.107.232, 192.168.107.233 |
| Event Gateway | 192.168.107.232 |
| External OpenSearch | 192.168.125.42 |
1.1.2 Secondary Site
| Component | Hosts |
|---|---|
| HAProxy VIP | 192.168.107.238 |
| Infra Services | 192.168.107.234, 192.168.107.235, 192.168.107.236, 192.168.107.237 |
| Platform Services | 192.168.107.234, 192.168.107.235 |
| Application Services | 192.168.107.235, 192.168.107.236 |
| Workers | 192.168.107.235, 192.168.107.236 |
| Event Gateway | 192.168.107.235 |
| External OpenSearch | 192.168.125.43 |
1.2 Software Requirements
Ensure the following software is installed on all nodes before proceeding.
- Ubuntu 22.04 / 24.04
- Docker Engine
- Docker Compose
- ZFS
- Syncoid
- Chrony or NTP
- RDAF CLI
1.2.1 Verification Commands
Use the following commands to verify that all required software is installed and running correctly.
- Verify that Docker is installed and check its version using the command below.
- Verify that the ZFS kernel module is loaded and check its version using the command below.
- Verify that Syncoid is available on the system PATH using the command below.
/usr/sbin/syncoid
/usr/sbin/syncoid version 2.2.0
(Getopt::Long::GetOptions version 2.54; Perl version 5.38.2)
- Verify that Chrony is running and tracking time correctly using the command below.
Reference ID    : 2D3F360D (lax1.caltick.net)
Stratum         : 3
Ref time (UTC)  : Wed Jun 17 04:32:34 2026
System time     : 0.000084018 seconds fast of NTP time
Last offset     : +0.000015266 seconds
RMS offset      : 0.001241019 seconds
Frequency       : 17.860 ppm slow
Residual freq   : +0.000 ppm
Skew            : 0.040 ppm
Root delay      : 0.017344564 seconds
Root dispersion : 0.000981541 seconds
Update interval : 1026.5 seconds
Leap status     : Normal
- Verify that the RDAF CLI is installed and accessible using the command below.
1.3 Network Requirements
Ensure that all primary and secondary nodes can communicate with each other over the required ports. Update your firewall rules or security group policies to allow inter-node traffic between the two sites.
1.4 ZFS Requirements
ZFS must be installed and configured on all nodes that will participate in replication. Ensure that the ZFS pool and datasets are created before running setup commands.
2. RDAF CLI ZFS Commands
| Command | Description |
|---|---|
rdaf zfs setup |
Deploys the ZFS replication scripts and configuration required for Geo-DR replication. This command prepares the environment but does not start replication timers. |
rdaf zfs failover |
Promotes the secondary site to the primary role and brings up services when the original primary site is unavailable. |
rdaf zfs start-replication |
Starts all configured ZFS replication jobs and resumes scheduled replication activities. |
rdaf zfs stop-replication |
Stops all scheduled ZFS replication activities without removing any existing configuration, snapshots, or replicated data. |
rdaf zfs start-snapshot |
Starts scheduled ZFS snapshot creation on all primary hosts by enabling the snapshot timers. |
rdaf zfs stop-snapshot |
Stops scheduled ZFS snapshot creation on all primary hosts without removing existing snapshots. |
rdaf zfs replication-status |
Provides a complete operational view of the Geo-DR replication environment, including replication health and synchronization status. |
rdaf zfs snapshot-status |
Displays the current status of scheduled snapshot operations, including the last execution time and result for each primary host. |
rdaf zfs current-status |
Displays replication jobs currently executing on secondary nodes. |
rdaf zfs list-snapshots |
Lists all available ZFS replication snapshots across primary and DR nodes. |
rdaf zfs rollback |
Restores a replicated component to a previous ZFS snapshot. |
rdaf zfs snapshot-restore |
Restores one or more services to the latest common snapshot and automatically brings the infrastructure, platform, and application services back online. |
rdaf zfs update-config |
Updates replication settings such as the replication interval, snapshot retention, and protected components without requiring a reset and setup operation. |
rdaf zfs add-service |
Adds a new service to the existing ZFS replication configuration by automatically discovering the required hosts from the RDAF configuration. |
rdaf zfs validate-setup |
Validates all ZFS replication prerequisites, including SSH connectivity, ZFS/syncoid installation, NTP synchronization, and dataset configuration before setup. |
rdaf zfs snapshot-setup |
Deploys the standalone ZFS snapshot scripts to all primary hosts. This command prepares the environment but does not start snapshot timers. |
rdaf zfs update-rdac-endpoint |
Updates the rda_client_api_url value in saasportal.serviceinstances to point to the current primary host. |
rdaf zfs update-graphdb-endpoints |
Updates stale cluster endpoint IP addresses in GraphDB configuration files after a failover or infrastructure change. |
rdaf zfs reset |
Completely removes the RDAF ZFS Geo-DR configuration from both primary and secondary sites. |
rdaf status |
Displays the current health and operational status of RDAF services. |
Warning
rdaf zfs reset is a destructive operation and should only be used when rebuilding, reconfiguring, or decommissioning Geo-DR replication.
3. Configure Primary
3.1 Install the RDAF CLI
Use the following command to install the RDAF CLI tool from the provided package archive. The --user flag installs it in your local user directory without requiring root privileges.
3.2 Create the Configuration File (config.json)
Create a JSON configuration file that defines your deployment topology. The example below is a sample configuration for the primary site. Adjust hostnames, passwords, and interface names as required for your environment.
{
  "accept_eula": true,
  "alt_names": "192.168.107.229,192.168.107.230,192.168.107.231,192.168.107.232,192.168.107.233,192.168.107.234,192.168.107.235,192.168.107.236,192.168.107.237,192.168.107.238",
  "app_service_ha": true,
  "platform_service_ha": true,
  "admin_organization": "cfx",
  "docker_registry_ca": "",
  "docker_source_user": "macaw",
  "docker_source_password": "Abcd123$",
  "nats_host": "192.168.107.230,192.168.107.231",
  "minio_server_host": "192.168.107.230,192.168.107.231,192.168.107.232,192.168.107.233",
  "minio_user": "rdafadmin",
  "minio_password": "admin1234",
  "mariadb_server_host": "192.168.107.230,192.168.107.231,192.168.107.232",
  "mariadb_user": "rdafadmin",
  "mariadb_password": "admin1234",
  "kafka_server_host": "192.168.107.230,192.168.107.231,192.168.107.232",
  "opensearch_server_host": "192.168.107.230,192.168.107.231,192.168.107.232",
  "opensearch_user": "rdafadmin",
  "opensearch_password": "admin1234",
  "graphdb_host": "192.168.107.230,192.168.107.231,192.168.107.232",
  "graphdb_password": "admin1234",
  "graphdb_user": "rdafadmin",
  "haproxy_host": "192.168.107.230,192.168.107.231",
  "advertised_ext_host": "192.168.107.229",
  "advertised_ext_interface": "ens160",
  "bind_internal_inf": false,
  "advertised_int_host": "",
  "advertised_int_interface": "",
  "platform_service_host": "192.168.107.230,192.168.107.231",
  "service_host": "192.168.107.232,192.168.107.233",
  "worker_host": "192.168.107.232,192.168.107.233",
  "rda_event_gateway_host": "192.168.107.232",
  "ssh_password": "xxxxxxxxxx",
  "ssh_user": "rdauser",
  "no_prompt": true
}
{
  "accept_eula": true,
  "alt_names": "192.168.107.229,192.168.107.230,192.168.107.231,192.168.107.232,192.168.107.233,192.168.107.234,192.168.107.235,192.168.107.236,192.168.107.237,192.168.107.238",
  "app_service_ha": true,
  "platform_service_ha": true,
  "admin_organization": "cfx",
  "docker_registry_ca": "",
  "docker_source_user": "macaw",
  "docker_source_password": "Abcd123$",
  "nats_host": "192.168.107.230,192.168.107.231",
  "minio_server_host": "192.168.107.230,192.168.107.231,192.168.107.232,192.168.107.233",
  "minio_user": "rdafadmin",
  "minio_password": "admin1234",
  "mariadb_server_host": "192.168.107.230,192.168.107.231,192.168.107.232",
  "mariadb_user": "rdafadmin",
  "mariadb_password": "admin1234",
  "kafka_server_host": "192.168.107.230,192.168.107.231,192.168.107.232",
  "opensearch_server_host": "192.168.107.230,192.168.107.231,192.168.107.232",
  "opensearch_user": "rdafadmin",
  "opensearch_password": "admin1234",
  "graphdb_host": "192.168.107.230,192.168.107.231,192.168.107.232",
  "graphdb_password": "admin1234",
  "graphdb_user": "rdafadmin",
  "haproxy_host": "192.168.107.230,192.168.107.231",
  "advertised_ext_host": "192.168.107.229",
  "advertised_ext_interface": "ens160",
  "bind_internal_inf": false,
  "advertised_int_host": "",
  "advertised_int_interface": "",
  "platform_service_host": "192.168.107.230,192.168.107.231",
  "service_host": "192.168.107.232,192.168.107.233",
  "worker_host": "192.168.107.232,192.168.107.233",
  "rda_event_gateway_host": "192.168.107.232",
  "ssh_key": true,
  "ssh_key_path": "/home/m66348/.ssh/id_rsa",
  "no_prompt": true
}
3.3 Primary RDAF Setup
Use the following command to run the RDAF setup for the primary site. This initializes the environment with ZFS support and configures it as the primary node. Replace user and password with your Docker registry credentials.
3.4 Verify the rdaf.cfg File
After setup completes, verify that the cat /opt/rdaf/rdaf.cfg file has been generated correctly and contains the expected configuration values. You should see the following content.
Note
Confirm that primary = true and zfs = true are present before proceeding.
3.5 Install Infrastructure, Platform, Worker, Application, and Edge Services
Run the following commands in sequence to install all required RDAF components on the primary site. Replace the appropriate release tag version for your deployment.
- Install infrastructure services (for example, NATS, MinIO, MariaDB, Kafka, OpenSearch, and GraphDB) using the command below.
- Install platform services using the command below.
- Install worker nodes using the command below.
- Install the OIA application using the command below.
- Apply the OIA-specific configuration updates using the command below.
- Install the RDAC CLI tool using the command below.
- Set up external OpenSearch integration using the command below .
- Install external OpenSearch using the specified tag version .
Note
Perform this step only if OpenSearch External is deployed.
- Install Bulk Stats services using the specified tag version
rdaf bulk_stats install --host 192.168.107.230,192.168.107.231,192.168.107.232 --tag 8.2.1 --ssh-password XXXXX
Note
if user wants to add new host for bulk stats use the below given command.
- Install File Object services installation using the specified tag version
rdaf file_object install --host 192.168.107.230 --host 192.168.107.231 --ssh-password XXXXX --tag 8.2.1
- Install Event Gateway services installation using the specified tag version
3.6 Validate the Primary Deployment
Run the following health check commands to confirm that all primary services are running correctly:
- Perform a full RDA platform health check using the command below.
- Perform an infrastructure-level health check using the command below.
- Access the RDAF portal using the primary site's HAProxy VIP.
3.7 Copy the Primary rdaf.cfg to the Secondary
Transfer the primary site's configuration file to the secondary node. This file is required to set up the secondary site in relation to the primary. Run the following command from the primary node.
scp /opt/rdaf/rdaf.cfg rdauser@192.168.107.234:/home/rdauser/primary.cfg
cp /opt/rdaf/rdaf.cfg /home/rdauser/primary_rdaf.cfg_original
4. Configure Secondary
4.1 Install the RDAF CLI
Use the following command to install the RDAF CLI tool from the provided package archive. The --user flag installs it in your local user directory without requiring root privileges.
4.2 Create the Configuration File (config.json)
Create a JSON configuration file that defines your deployment topology. The example below is a sample configuration for the secondary site. Adjust hostnames, passwords, and interface names as required for your environment.
{
  "accept_eula": true,
  "alt_names": "",
  "app_service_ha": true,
  "platform_service_ha": true,
  "admin_organization": "cfx",
  "docker_registry_ca": "",
  "docker_source_user": "macaw",
  "docker_source_password": "Abcd123$",
  "nats_host": "192.168.121.180,192.168.121.181",
  "minio_server_host": "192.168.121.180,192.168.121.181,192.168.121.182,192.168.121.183",
  "minio_user": "rdafadmin",
  "minio_password": "admin1234",
  "mariadb_server_host": "192.168.121.180,192.168.121.181,192.168.121.182",
  "mariadb_user": "rdafadmin",
  "mariadb_password": "admin1234",
  "kafka_server_host": "192.168.121.180,192.168.121.181,192.168.121.182",
  "opensearch_server_host": "192.168.121.180,192.168.121.181,192.168.121.182",
  "opensearch_user": "rdafadmin",
  "opensearch_password": "admin1234",
  "graphdb_host": "192.168.121.180,192.168.121.181,192.168.121.182",
  "graphdb_password": "admin1234",
  "graphdb_user": "rdafadmin",
  "haproxy_host": "192.168.121.186,192.168.121.187",
  "advertised_ext_host": "192.168.121.191",
  "advertised_ext_interface": "ens160",
  "bind_internal_inf": false,
  "advertised_int_host": "",
  "advertised_int_interface": "",
  "platform_service_host": "192.168.121.186,192.168.121.187",
  "service_host": "192.168.121.186,192.168.121.187",
  "worker_host": "192.168.121.186,192.168.121.187",
  "rda_event_gateway_host": "192.168.121.186,192.168.121.187",
  "ssh_password": "xxxxxxxxxx",
  "ssh_user": "rdauser",
  "no_prompt": true
}
{
  "accept_eula": true,
  "alt_names": "",
  "app_service_ha": true,
  "platform_service_ha": true,
  "admin_organization": "cfx",
  "docker_registry_ca": "",
  "docker_source_user": "macaw",
  "docker_source_password": "Abcd123$",
  "nats_host": "192.168.121.171,192.168.121.172",
  "minio_server_host": "192.168.121.171,192.168.121.172,192.168.121.173,192.168.121.177",
  "minio_user": "rdafadmin",
  "minio_password": "admin1234",
  "mariadb_server_host": "192.168.121.171,192.168.121.172,192.168.121.173",
  "mariadb_user": "rdafadmin",
  "mariadb_password": "admin1234",
  "kafka_server_host": "192.168.121.171,192.168.121.172,192.168.121.173",
  "opensearch_server_host": "192.168.121.171,192.168.121.172,192.168.121.173",
  "opensearch_user": "rdafadmin",
  "opensearch_password": "admin1234",
  "graphdb_host": "192.168.121.171,192.168.121.172,192.168.121.173",
  "graphdb_password": "admin1234",
  "graphdb_user": "rdafadmin",
  "haproxy_host": "192.168.121.177,192.168.121.178",
  "advertised_ext_host": "192.168.121.189",
  "advertised_ext_interface": "ens160",
  "bind_internal_inf": false,
  "advertised_int_host": "",
  "advertised_int_interface": "",
  "platform_service_host": "192.168.121.177,192.168.121.178",
  "service_host": "192.168.121.177,192.168.121.178",
  "worker_host": "192.168.121.177,192.168.121.178",
  "rda_event_gateway_host": "192.168.121.177,192.168.121.178",
  "ssh_key": true,
  "ssh_key_path": "/home/m66348/.ssh/id_rsa",
  "no_prompt": true
}
4.3 Secondary RDAF Setup
On the secondary node, run the following setup command. This configures the node as a secondary site, using the primary configuration that was copied in the previous step.
4.4 Verify the rdaf-peer.cfg File
After setup completes, verify that the rdaf-peer.cfg file has been generated in the /opt/rdaf/ directory.
Expected output should include:
Note
The presence of rdaf-peer.cfg confirms that the secondary site has been correctly paired with the primary.
4.5 Install Components on the Secondary Site
Run the following commands on the secondary node to install all RDAF services. Replace xxx with the appropriate release tag version.
- Install infrastructure services on the secondary site using the command below.
- Install platform services using the command below.
- Install worker nodes using the command below.
- Install the OIA application using the command below.
- Apply the OIA-specific configuration updates using the command below.
- Install the RDAC CLI tool using the command below.
- Set up external OpenSearch on the secondary site using the command below .
- Install external OpenSearch using the specified tag version .
Note
Perform this step only if OpenSearch External is deployed.
- Install Bulk Stats services using the specified tag version.
rdaf bulk_stats install --host 192.168.107.234,192.168.107.235,192.168.107.236 --tag 8.2.1 --ssh-password XXXXX
Note
if user wants to add new host for bulk stats use the below given command.
- Install File Object services installation using the specified tag version.
rdaf file_object install --host 192.168.107.234 --host 192.168.107.235 --ssh-password XXXXX --tag 8.2.1
- Install Event Gateway services installation using the specified tag version.
4.6 Validate the Secondary Deployment
Run the following commands on the secondary node to confirm all services are healthy.
4.7 Copy the Secondary rdaf.cfg Back to the Primary
Once the secondary setup is complete, transfer the secondary node's configuration file back to the primary. Run the following command from the secondary node.
scp /opt/rdaf/rdaf.cfg rdauser@192.168.107.230:/home/rdauser/secondary.cfg
cp /opt/rdaf/rdaf.cfg /home/rdauser/secondary_rdaf.cfg_original
4.8 Prepare Secondary Site for ZFS Replication
Ensure that all RDAF services are stopped on the secondary site before starting ZFS replication.
rdaf worker down --no-prompt
rdaf event_gateway down --no-prompt
rdaf bulk_stats down --no-prompt
rdaf file_object down --no-prompt
rdaf app down --no-prompt
rdaf platform down --no-prompt
rdaf infra down --no-prompt
rdaf opensearch_external down --no-prompt
5. Configure ZFS Replication
5.1 Validate ZFS Setup
Before configuring replication, validate that the ZFS environment is correctly set up on both sites. Run the following command from the primary node, providing the SSH password and the path to the secondary configuration file.
The rdaf zfs validate-setup command is a pre-flight validation utility that verifies all prerequisites required for ZFS-based Geo-DR replication before executing rdaf zfs setup.
It ensures that the primary and secondary environments are correctly configured and capable of supporting automated ZFS replication.
Note
Resolve any reported issues before proceeding.
5.2 Initialize ZFS Replication Setup
Use the following command to configure ZFS replication between the primary and secondary sites. The --interval-minutes flag controls how frequently incremental snapshots are sent to the secondary site (set to 5 minutes in this example).
The rdaf zfs setup command performs the initial configuration of ZFS-based Geo-DR replication between the Primary and Secondary RDAF sites.
This is a one-time initialization operation that prepares all replication infrastructure, deploys replication services, performs the initial dataset synchronization, and stores replication configuration in the RDAF configuration files.
5.3 Start Replication
Use the following command to begin the ZFS replication process. This will start sending snapshots from the primary site to the secondary site at the configured interval.
5.4 Monitor Replication Status
Use the following command at any time to check the current status of the replication process. Confirm that snapshots are being successfully sent and received.
+------------+-----------------+-----------------+----------------------+--------+----------+----------+
| Pool       | Primary         | Secondary       | Last Run             | Result | Duration | Verified |
+------------+-----------------+-----------------+----------------------+--------+----------+----------+
| kafka-logs | 192.168.108.132 | 192.168.107.132 | 2026-06-08T08:00:32Z | ok     | 822ms    | pair     |
| mysql      | 192.168.108.132 | 192.168.107.132 | 2026-06-08T08:00:35Z | ok     | 958ms    | pair     |
| minio-data | 192.168.108.132 | 192.168.107.132 | 2026-06-08T08:00:36Z | ok     | 881ms    | pair     |
| opensearch | 192.168.108.132 | 192.168.107.132 | 2026-06-08T08:00:39Z | ok     | 1.8s     | pair     |
| graphdb    | 192.168.108.132 | 192.168.107.132 | 2026-06-08T08:00:41Z | ok     | 1.2s     | pair     |
| kafka-logs | 192.168.108.133 | 192.168.107.133 | 2026-06-08T08:00:33Z | ok     | 964ms    | pair     |
| mysql      | 192.168.108.133 | 192.168.107.133 | 2026-06-08T08:00:35Z | ok     | 1.4s     | pair     |
| minio-data | 192.168.108.133 | 192.168.107.133 | 2026-06-08T08:00:37Z | ok     | 823ms    | pair     |
| opensearch | 192.168.108.133 | 192.168.107.133 | 2026-06-08T08:00:39Z | ok     | 1.5s     | pair     |
| graphdb    | 192.168.108.133 | 192.168.107.133 | 2026-06-08T08:00:40Z | ok     | 928ms    | pair     |
+------------+-----------------+---------------+----------------------+--------+----------+----------+
  Coordinator  Timer: active
+--------------------+--------------+----------------------+--------------------------------------------+
| Snapshot           | Status       | Timestamp            | Detail                                     |
+--------------------+--------------+----------------------+--------------------------------------------+
| auto-20260608-0740 | no-prev      | 2026-06-08T07:47:21Z | previous cycle did not run (no GO          |
|                    |              |                      | published)                                 |
| auto-20260608-0745 | go-published | 2026-06-08T07:47:21Z |                                            |
| auto-20260608-0745 | incomplete   | 2026-06-08T07:50:00Z | go-published but no snapshots on any node  |
|                    |              |                      | (snapshot phase fa                         |
| auto-20260608-0750 | no-go        | 2026-06-08T07:50:00Z | halt: prev-incomplete(auto-20260608-0745)  |
| auto-20260608-0750 | no-prev      | 2026-06-08T07:55:00Z | previous cycle did not run (no GO          |
|                    |              |                      | published)                                 |
| auto-20260608-0755 | go-published | 2026-06-08T07:55:00Z |                                            |
| auto-20260608-0755 | verified     | 2026-06-08T08:00:00Z |                                            |
| auto-20260608-0800 | go-published | 2026-06-08T08:00:00Z |                                            |
+--------------------+--------------+----------------------+--------------------------------------------+
Per-Pool Replication Status
This section shows the replication status for each ZFS pool.
| Field | Description |
|---|---|
| Pool | ZFS pool being replicated. |
| Primary | Source host for the replication. |
| Secondary | Destination host for the replication. |
| Last Run | Timestamp of the most recent replication attempt. |
| Result | Status of the replication attempt.ok – Replication completed successfully.fail – Replication started but failed during the process.skip – The coordinator did not allow the replication cycle to run.no runs yet – Replication has not run yet. |
| Duration | Time taken to complete the replication. |
| Verified | Indicates whether the snapshot was verified across the primary and secondary hosts. |
Coordinator Status
The coordinator controls the replication cycle and verifies snapshots across the involved hosts.
The Coordinator Status can have the following values:
go-published– The coordinator has completed the previous verification and allowed the next replication cycle to proceed.verified– Snapshots from the previous cycle were found on all expected primary and secondary hosts.incomplete– The previous replication interval did not complete. The replication is stuck, so the next cycle will pause.no-prev– The previous cycle was not initiated. This can occur during the first run or when a GO signal was not published.no-go– The coordinator blocked replication for that interval. Check the Detail column for the reason.
6. Failover Test
6.1 Verify Replication is Active
Before performing the failover test, confirm that replication is up to date and running without errors.
6.2 Simulate an Outage
To test the failover procedure, simulate a primary site outage by either:
- Shutting down all primary services, or
- Isolating the primary site from the network.
6.3 Execute the Failover
Run the following command on the secondary node to initiate failover. This command will automatically perform all necessary actions to bring up the secondary site as the active site.
Actions performed automatically during failover:
- Promote ZFS datasets on the secondary site
- Update the active site role
- Start infrastructure services
- Start platform services
- Start application services
6.4 Update RDAC Endpoint and Portal Configuration
After failover, update the RDAC CLI endpoint and the platform portal to point to the secondary site.
After a successful failover, the RDAF platform must update tenant connectivity information so that external systems, RDAC clients, and portal integrations communicate with the newly promoted DR site.
- Update the RDAC CLI to use the secondary site's endpoint using the command below.
2026-06-08 09:35:22,565 [rdaf.cmd.zfs] INFO     - Fetching serviceinstances rows with rda_client_api_url ...
2026-06-08 09:35:22,630 [rdaf.cmd.zfs] INFO     - Updating id=333e88d3-ef37-444e-87f8-6f5adb1f7831 rda_client_api_url -> http://192.168.107.230:8808
2026-06-08 09:35:22,686 [rdaf.cmd.zfs] INFO     - rda_client_api_url updated to http://192.168.107.230:8808 successfully.
2026-06-08 09:35:22,687 [rdaf.cmd.zfs] INFO     - Updating tenant secret key on portal at 192.168.107.230 ...
2026-06-08 09:35:22,735 [rdaf.cmd.zfs] INFO     - Tenant secret key updated successfully.
- Update the platform portal configuration for the secondary site using the command below.
2026-06-08 09:36:35,464 [rdaf.component.platform] INFO     - Updating network configuration on portal...
2026-06-08 09:36:35,524 [rdaf.component.platform] INFO     - {"serviceError":null,"serviceResult":"updated successfully","serviceName":"CloudFabrix Portal"}

2026-06-08 09:36:35,525 [rdaf.component.platform] INFO     - Network configuration updated successfully!
- Update the OIA application configuration and regenerate the HAProxy settings for the secondary site using the command below.
2026-06-17 06:47:18,578 [rdaf.component.haproxy] INFO     - Updated HAProxy configuration at /opt/rdaf/config/haproxy/haproxy.cfg on 192.168.107.230
2026-06-17 06:47:19,129 [rdaf.component.haproxy] INFO     - Updated HAProxy configuration at /opt/rdaf/config/haproxy/haproxy.cfg on 192.168.107.231
2026-06-17 06:47:19,194 [rdaf.component.haproxy] INFO     - Restarting Haproxy on host: 192.168.107.231
[+] Restarting 1/11,534 [rdaf.component] INFO     -
 ✔ Container infra-haproxy-1  Started                                     11.8s

2026-06-17 06:47:31,704 [rdaf.component.haproxy] INFO     - Restarting Haproxy on host: 192.168.107.230
[+] Restarting 1/1
 ✔ Container infra-haproxy-1  Started
Warning
After a few minutes, access the secondary site UI and verify that all services are accessible and functioning correctly.
- Access the RDAF portal using the secondary site's HAProxy VIP.
6.5 Validate Services Post-Failover
Run the following health check commands to confirm that all services are functioning correctly on the secondary site.
- Check the overall RDAF service status using the command below.
- Perform a full RDA infrastructure health check using the command below.
- Perform a full RDA platform health check using the command below.
6.5.1 Manual Validation Checklist
Log in to the portal and verify the following:
| Step | Validation Check |
|---|---|
| 1 | Verify that login is successful. |
| 2 | Verify that dashboards are loading correctly. |
| 3 | Verify that inventory data is present. |
| 4 | Verify that events are being captured. |
| 5 | Verify that workflows are running as expected. |
7. Failback Test
After the primary site has been restored and is ready to resume active duties, perform the following steps to return operations to the primary site.
| Step | Action | Description |
|---|---|---|
| 1 | Restore Primary | Bring up all primary site services and confirm they are healthy. |
| 2 | Remove all containers on Primary | Stop/Remove all containers on primary site services. |
| 3 | Setup zfs replications | rdaf zfs validate-setup --ssh-password xxxxxxxxx --secondary-cfg secondary.cfg |
| 4 | Start replication on Primary | Start replication (rdaf zfs start-replication). |
| 5 | Resync Data | Re-establish ZFS replication from the secondary back to the primary to synchronize any data changes that occurred during the failover period. |
| 6 | Return VIP | Switch the HAProxy Virtual IP (VIP) back to the primary site so that traffic is directed correctly. |
| 7 | Validate Replication | Confirm that replication is running in the correct direction (secondary → primary) and that all data has been synchronized. |
The rdaf zfs validate-setup command is a pre-flight validation utility that verifies all prerequisites required for ZFS-based Geo-DR replication before executing rdaf zfs setup.
It ensures that the primary and secondary environments are correctly configured and capable of supporting automated ZFS replication.
Note
Resolve any reported issues before proceeding.
7.1 Prepare Primary Site for ZFS Replication
Ensure that all RDAF services are stopped on the primary site before starting ZFS replication.
rdaf worker down --no-prompt
rdaf event_gateway down --no-prompt
rdaf bulk_stats down --no-prompt
rdaf file_object down --no-prompt
rdaf app down --no-prompt
rdaf platform down --no-prompt
rdaf infra down --no-prompt
rdaf opensearch_external down --no-prompt
7.2 Initialize ZFS Replication Setup
Use the following command to configure ZFS replication between the primary and secondary sites. The --interval-minutes flag controls how frequently incremental snapshots are sent to the secondary site (set to 5 minutes in this example).
The rdaf zfs setup command performs the initial configuration of ZFS-based Geo-DR replication between the Primary and Secondary RDAF sites.
This operation is performed every time replication is initialized. It prepares the replication infrastructure, deploys replication services, performs dataset synchronization, and updates the replication configuration in the RDAF configuration files.
7.3 Start Replication
Use the following command to begin the ZFS replication process. This will start sending snapshots from the primary site to the secondary site at the configured interval.
7.4 Monitor Replication Status
Use the following command at any time to check the current status of the replication process. Confirm that snapshots are being successfully sent and received.
8. Manage ZFS Snapshots
ZFS snapshots provide point-in-time copies of the RDAF datasets, allowing you to create backups and restore the environment when required. Use the following commands to configure, manage, monitor, and restore ZFS snapshots.
Note
This feature supports Standalone and HA deployments only. It is not supported in Geo-DR environments.
8.1 Configure Snapshot Schedule
Use the following command to configure the ZFS snapshot schedule.
The rdaf zfs snapshot-setup command configures automated snapshot creation by defining the snapshot frequency and retention policy. This is typically performed once before enabling scheduled snapshots.
In the above example:
-
--interval-minutes 5configures the snapshot scheduler to create a new ZFS snapshot every 5 minutes. -
--keep-snapshots 5specifies that only the five most recent snapshots are retained.
dauser@infra109123:~$ rdaf zfs snapshot-setup --keep-snapshots 5  --interval-minutes 5
                                                                             ZFS Snapshot-Only Setup:
                                                         192.168.109.123: minio-data, opensearch, kafka-logs, graphdb, mysql
                                                                         Interval: 5 min, Keep: 5 snapshots

Proceed with setup? [yes/no]: yes
2026-08-06 08:54:54,184 [rdaf.cmd.zfs] INFO     - Deploying snapshot scripts to 192.168.109.123 (pools: minio-data opensearch kafka-logs graphdb mysql)
yyees
2026-08-06 08:54:55,750 [rdaf.cmd.zfs] INFO     - ZFS snapshot config written to /opt/rdaf/rdaf.cfg
2026-08-06 08:54:55,751 [rdaf.cmd.zfs] INFO     - Snapshot-only setup complete. Run 'rdaf zfs start-snapshot' to enable timers.
8.2 Start Snapshot Schedule
Use the following command to enable scheduled snapshot creation.
The rdaf zfs start-snapshot command starts scheduled ZFS snapshot creation on all primary hosts by enabling the snapshot timers.
rdauser@infra109123:~$ rdaf zfs start-snapshot
2026-08-06 08:55:00,093 [rdaf.cmd.zfs] INFO     - Enabling snapshot timers...
2026-08-06 08:55:00,093 [rdaf.cmd.zfs] INFO     - Enabling zfs-snapshot.timer on 192.168.109.123...
2026-08-06 08:55:02,208 [rdaf.cmd.zfs] INFO     - ZFS snapshots enabled on 1 host(s)
8.3 Monitor Snapshot Status
Use the following command to verify the current status of the snapshot scheduler.
The rdaf zfs snapshot-status command displays the current status of scheduled snapshot operations, including the last execution time and result for each primary host.
rdauser@infra109123:~$ rdaf zfs snapshot-status

  Host       192.168.109.123    Timer: active

+------------+---------------+----------------------+--------+
| Pool       | Host          | Last Run             | Result |
+------------+---------------+----------------------+--------+
| minio-data | 192.168.109.123 | 2026-08-06T08:55:05Z | ok   |
| opensearch | 192.168.109.123 | 2026-08-06T08:55:05Z | ok   |
| kafka-logs | 192.168.109.123 | 2026-08-06T08:55:06Z | ok   |
| graphdb    | 192.168.109.123 | 2026-08-06T08:55:07Z | ok   |
| mysql      | 192.168.109.123 | 2026-08-06T08:55:08Z | ok   |
+------------+-----------------+----------------------+------+
8.4 List Available Snapshots
Use the following command to display all available ZFS snapshots.
The rdaf zfs list-snapshots command lists all available ZFS snapshots that can be used for restore operations.
rdauser@infra109123:~$ rdaf zfs list-snapshots
+-----------------+---------------------+--------------------+---------------------+---------+
| Host            | Service             | Snapshot           | Created (UTC)       | State   |
+-----------------+---------------------+--------------------+---------------------+---------+
| 192.168.108.132 | kafka               | auto-20260814-0650 | 2026-08-14 06:50:37 | cluster |
| 192.168.108.132 | kafka               | auto-20260814-0655 | 2026-08-14 06:55:33 | cluster |
| 192.168.108.132 | kafka               | auto-20260814-0700 | 2026-08-14 07:00:35 | cluster |
| 192.168.108.132 | kafka               | auto-20260814-0705 | 2026-08-14 07:05:32 | cluster |
| 192.168.108.132 | kafka               | auto-20260814-0710 | 2026-08-14 07:10:34 | pair    |
| 192.168.108.133 | kafka               | auto-20260814-0650 | 2026-08-14 06:50:35 | cluster |
| 192.168.108.133 | kafka               | auto-20260814-0655 | 2026-08-14 06:55:31 | cluster |
| 192.168.108.133 | kafka               | auto-20260814-0700 | 2026-08-14 07:00:34 | cluster |
| 192.168.108.133 | kafka               | auto-20260814-0705 | 2026-08-14 07:05:36 | cluster |
| 192.168.108.133 | kafka               | auto-20260814-0710 | 2026-08-14 07:10:33 | pair    |
+-----------------+---------------------+--------------------+---------------------+---------+
| Field | Description |
|---|---|
| Host | Host for the service. |
| Service | Name of the component/service. |
| Snapshot | Name of the snapshot for that service. |
| Created | Time at which the snapshot was created. |
| State | Cluster: Indicates that the particular snapshot has been verified across all expected primary and secondary hosts.Pair: Indicates that the particular snapshot has been verified across its pair, meaning the snapshot has reached the secondary host.Unverified: Indicates that the snapshot has not been verified for its secondary pair or across the cluster.Note: The last snapshot in the list will remain in the Pair state until the coordinator verifies it across all hosts during the next run. |
8.5 Stop Snapshot Schedule
Use the following command to stop scheduled snapshot creation.
The rdaf zfs stop-snapshot command stops scheduled ZFS snapshot creation on all primary hosts without removing existing snapshots.
rdauser@infra109123:~$ rdaf zfs stop-snapshot
2026-08-06 08:57:57,364 [rdaf.cmd.zfs] INFO     - Stopping zfs-snapshot.timer on 192.168.109.123...
Removed "/etc/systemd/system/timers.target.wants/zfs-snapshot.timer".
2026-08-06 08:57:58,272 [rdaf.cmd.zfs] INFO     - ZFS snapshot timers stopped on 1 host(s)
8.6 Restore from a Snapshot
Use the following command to restore the environment from a previously created snapshot.
The rdaf zfs snapshot-restore command restores one or more services to the latest available snapshot and automatically brings the infrastructure, platform, and application services back online.
Warning
Restoring a snapshot replaces the current data with the contents of the selected snapshot. Ensure that the correct snapshot is selected before proceeding.
rdauser@infra109123:~$ rdaf zfs snapshot-restore
2026-08-06 09:23:16,208 [rdaf.cmd.zfs] INFO - Recovering infra services component by component...
2026-08-06 09:23:16,209 [rdaf.cmd.zfs] INFO - --- kafka: starting zfs_failover ---
2026-08-06 09:23:16,551 [rdaf.component] INFO - kafka on 192.168.109.123: already up and running.
2026-08-06 09:23:16,552 [rdaf.component] INFO - kafka: all hosts healthy — skipping rollback and bring-up.
2026-08-06 09:23:16,552 [rdaf.cmd.zfs] INFO - --- mariadb: starting zfs_failover ---
2026-08-06 09:23:16,732 [rdaf.component] INFO - mariadb on 192.168.109.123: already up and running.
2026-08-06 09:23:16,732 [rdaf.component] INFO - mariadb: all hosts healthy — skipping rollback and bring-up.
2026-08-06 09:23:16,733 [rdaf.cmd.zfs] INFO - --- minio: starting zfs_failover ---
2026-08-06 09:23:16,843 [rdaf.component] INFO - minio on 192.168.109.123: already up and running.
2026-08-06 09:23:16,843 [rdaf.component] INFO - minio: all hosts healthy — skipping rollback and bring-up.
2026-08-06 09:23:16,844 [rdaf.cmd.zfs] INFO - --- opensearch: starting zfs_failover ---
2026-08-06 09:23:17,565 [rdaf.component] INFO - opensearch on 192.168.109.123: already up and running.
2026-08-06 09:23:17,566 [rdaf.component] INFO - opensearch: all hosts healthy — skipping rollback and bring-up.
2026-08-06 09:23:17,566 [rdaf.cmd.zfs] INFO - --- graphdb: starting zfs_failover ---
2026-08-06 09:23:17,574 [rdaf.component] INFO - graphdb on 192.168.109.123: already up and running.
2026-08-06 09:23:17,575 [rdaf.component] INFO - graphdb: all hosts healthy — skipping rollback and bring-up.
2026-08-06 09:23:17,575 [rdaf.cmd.zfs] INFO - --- opensearch_external: starting zfs_failover ---
2026-08-06 09:23:17,575 [rdaf.component] INFO - opensearch_external: no hosts configured — skipping.
2026-08-06 09:23:17,576 [rdaf.cmd.zfs] INFO - --- nats: starting zfs_failover ---
2026-08-06 09:23:17,743 [rdaf.component] INFO - nats on 192.168.109.123: already up and running.
2026-08-06 09:23:17,744 [rdaf.component] INFO - nats: all hosts healthy — skipping rollback and bring-up.
2026-08-06 09:23:17,745 [rdaf.cmd.zfs] INFO - --- qdrant: starting zfs_failover ---
2026-08-06 09:23:17,745 [rdaf.component] INFO - qdrant: no hosts configured — skipping.
2026-08-06 09:23:17,745 [rdaf.cmd.zfs] INFO - --- haproxy: starting zfs_failover ---
2026-08-06 09:23:17,752 [rdaf.component] INFO - haproxy on 192.168.109.123: already up and running.
2026-08-06 09:23:17,753 [rdaf.component] INFO - haproxy: all hosts healthy — skipping rollback and bring-up.
2026-08-06 09:23:17,753 [rdaf.cmd.zfs] INFO - Starting failover infra health checks.
2026-08-06 09:23:17,753 [rdaf.cmd.zfs] INFO - Running failover infra component health checks...
2026-08-06 09:23:17,753 [rdaf.cmd.zfs] INFO - Checking nats health on 192.168.109.123...
2026-08-06 09:23:17,906 [rdaf.cmd.zfs] INFO - nats on 192.168.109.123 - Service Status: OK (N/A)
2026-08-06 09:23:18,232 [rdaf.cmd.zfs] INFO - Checking minio health on 192.168.109.123...
2026-08-06 09:23:18,326 [rdaf.cmd.zfs] INFO - minio on 192.168.109.123 - Service Status: OK (N/A)
2026-08-06 09:23:18,605 [rdaf.cmd.zfs] INFO - Checking mariadb health on 192.168.109.123...
2026-08-06 09:23:18,710 [rdaf.cmd.zfs] INFO - mariadb on 192.168.109.123 - Service Status: OK (N/A)
2026-08-06 09:23:19,015 [rdaf.cmd.zfs] INFO - Checking opensearch health on 192.168.109.123...
2026-08-06 09:23:19,190 [rdaf.cmd.zfs] INFO - opensearch on 192.168.109.123 - Service Status: OK (N/A)
2026-08-06 09:23:19,533 [rdaf.cmd.zfs] INFO - Checking kafka health on 192.168.109.123...
2026-08-06 09:23:19,857 [rdaf.cmd.zfs] INFO - kafka on 192.168.109.123 - Service Status: OK (N/A)
2026-08-06 09:23:20,198 [rdaf.cmd.zfs] INFO - Checking graphdb health on 192.168.109.123...
2026-08-06 09:23:20,206 [rdaf.cmd.zfs] INFO - graphdb on 192.168.109.123 - Service Status: OK (N/A)
2026-08-06 09:23:20,506 [rdaf.cmd.zfs] INFO - Checking haproxy health on 192.168.109.123...
2026-08-06 09:23:20,516 [rdaf.cmd.zfs] INFO - haproxy on 192.168.109.123 - Service Status: OK (N/A)
2026-08-06 09:23:20,831 [rdaf.cmd.zfs] INFO - No hosts configured for keepalived, skipping failover health check.
2026-08-06 09:23:20,832 [rdaf.cmd.zfs] INFO - Skipping nginx failover health check.
2026-08-06 09:23:20,832 [rdaf.cmd.zfs] INFO - No hosts configured for proxy, skipping failover health check.
2026-08-06 09:23:20,832 [rdaf.cmd.zfs] INFO - Failover infra component health checks completed successfully.
2026-08-06 09:23:20,832 [rdaf.cmd.zfs] INFO - MariaDB standalone — skipping wsrep cluster checks.
2026-08-06 09:23:20,832 [rdaf.cmd.zfs] INFO - Checking OpenSearch cluster health on 192.168.109.123...
2026-08-06 09:23:20,915 [rdaf.cmd.zfs] INFO - OpenSearch cluster health after failover is yellow.
2026-08-06 09:23:20,915 [rdaf.cmd.zfs] INFO - OpenSearch cluster health check completed successfully.
2026-08-06 09:23:20,918 [rdaf.cmd.zfs] INFO - No external OpenSearch hosts configured, skipping failover external OpenSearch cluster check.
2026-08-06 09:23:20,918 [rdaf.cmd.zfs] INFO - Checking MinIO nodes and disks on 192.168.109.123...
2026-08-06 09:23:20,998 [rdaf.cmd.zfs] INFO - MinIO nodes and disks check completed successfully.
+------------+-----------------+--------+--------------------------+-----------------+--------------+
| Name | Check | Status | Reason | Host | Container Id |
+------------+-----------------+--------+--------------------------+-----------------+--------------+
| nats | Service Status | OK | N/A | 192.168.109.123 | a3694db29345 |
| nats | Firewall Port | OK | N/A | 192.168.109.123 | a3694db29345 |
| nats | Port Connection | OK | N/A | 192.168.109.123 | a3694db29345 |
| minio | Service Status | OK | N/A | 192.168.109.123 | be04a43a2126 |
| minio | Firewall Port | OK | N/A | 192.168.109.123 | be04a43a2126 |
| minio | Port Connection | OK | N/A | 192.168.109.123 | be04a43a2126 |
| mariadb | Service Status | OK | N/A | 192.168.109.123 | dfab585cad10 |
| mariadb | Firewall Port | OK | N/A | 192.168.109.123 | dfab585cad10 |
| mariadb | Port Connection | OK | N/A | 192.168.109.123 | dfab585cad10 |
| opensearch | Service Status | OK | N/A | 192.168.109.123 | 51b7c318fd16 |
| opensearch | Firewall Port | OK | N/A | 192.168.109.123 | 51b7c318fd16 |
| opensearch | Port Connection | OK | N/A | 192.168.109.123 | 51b7c318fd16 |
| kafka | Service Status | OK | N/A | 192.168.109.123 | 96821078b5b1 |
| kafka | Firewall Port | OK | N/A | 192.168.109.123 | 96821078b5b1 |
| kafka | Port Connection | OK | N/A | 192.168.109.123 | 96821078b5b1 |
| graphdb | Service Status | OK | N/A | 192.168.109.123 | 1d2448d5221c |
| graphdb | Firewall Port | OK | N/A | 192.168.109.123 | 1d2448d5221c |
| graphdb | Port Connection | OK | N/A | 192.168.109.123 | 1d2448d5221c |
| haproxy | Service Status | OK | N/A | 192.168.109.123 | 0bb1d092b700 |
| haproxy | Firewall Port | OK | N/A | 192.168.109.123 | 0bb1d092b700 |
| haproxy | Port Connection | OK | N/A | 192.168.109.123 | 0bb1d092b700 |
| opensearch | Cluster Health | OK | cluster health is yellow | 192.168.109.123 | N/A |
| minio | Nodes | OK | 1/1 nodes online | 192.168.109.123 | N/A |
| minio | Disks | OK | 1/1 disks online | 192.168.109.123 | N/A |
+------------+-----------------+--------+--------------------------+-----------------+--------------+
2026-08-06 09:23:21,027 [rdaf.cmd.zfs] INFO - All failover infra health checks passed.
2026-08-06 09:23:21,028 [rdaf.cmd.zfs] INFO - Bringing platform services up...
2026-08-06 09:23:21,132 [rdaf.component.platform] INFO - Creating platform services on host 192.168.109.123
[+] Running 13/0
✔ Container platform-cfx-rda-resource-manager-1 Running 0.0s
✔ Container platform-rda_registry-1 Running 0.0s
✔ Container platform-rda_fsm-1 Running 0.0s
✔ Container platform-rda_scheduler-1 Running 0.0s
✔ Container platform-rda_identity-1 Running 0.0s
✔ Container platform-rda_collector-1 Running 0.0s
✔ Container platform-portal-frontend-1 Running 0.0s
✔ Container platform-portal-backend-1 Running 0.0s
✔ Container platform-rda_api_server-1 Running 0.0s
✔ Container platform-rda_chat_helper-1 Running 0.0s
✔ Container platform-rda_asm-1 Running 0.0s
✔ Container platform-cfx-rda-access-manager-1 Running 0.0s
✔ Container platform-cfx-rda-user-preferences-1 Running 0.0s
+--------------------------+-----------------+---------------+--------------+-------+
| Name | Host | Status | Container Id | Tag |
+--------------------------+-----------------+---------------+--------------+-------+
| rda_api_server | 192.168.109.123 | Up 28 minutes | 89978bc8db3d | 8.2.1 |
| | | | | |
| rda_registry | 192.168.109.123 | Up 28 minutes | 472e4617de8c | 8.2.1 |
| | | | | |
| rda_scheduler | 192.168.109.123 | Up 28 minutes | 5fdadbd9eda1 | 8.2.1 |
| | | | | |
| rda_collector | 192.168.109.123 | Up 28 minutes | 07b303847922 | 8.2.1 |
| | | | | |
| rda_identity | 192.168.109.123 | Up 28 minutes | 09df3d773301 | 8.2.1 |
| | | | | |
| rda_asm | 192.168.109.123 | Up 28 minutes | c3e8fa0ffb9f | 8.2.1 |
| | | | | |
| rda_fsm | 192.168.109.123 | Up 28 minutes | e341a016faf0 | 8.2.1 |
| | | | | |
| rda_chat_helper | 192.168.109.123 | Up 27 minutes | d5f80433ec2e | 8.2.1 |
| | | | | |
| cfx-rda-access-manager | 192.168.109.123 | Up 27 minutes | a8058a4669fe | 8.2.1 |
| | | | | |
| cfx-rda-resource-manager | 192.168.109.123 | Up 27 minutes | 69c68a147831 | 8.2.1 |
| | | | | |
| cfx-rda-user-preferences | 192.168.109.123 | Up 27 minutes | 7d00e8111585 | 8.2.1 |
| | | | | |
| portal-backend | 192.168.109.123 | Up 27 minutes | 200ed31b6876 | 8.2.1 |
| | | | | |
| portal-frontend | 192.168.109.123 | Up 27 minutes | 1ac779d3b0d9 | 8.2.1 |
| | | | | |
+--------------------------+-----------------+---------------+--------------+-------+
2026-08-06 09:23:22,897 [rdaf.cmd.zfs] INFO - Bringing rda_worker up...
2026-08-06 09:23:22,898 [rdaf.component.worker] INFO - Creating worker on host 192.168.109.123
[+] Running 1/0
✔ Container deployment-scripts-rda_worker-1 Running 0.0s
2026-08-06 09:23:23,010 [rdaf.cmd.zfs] INFO - Bringing oia up...
2026-08-06 09:23:23,100 [rdaf.component.oia] INFO - Creating oia services on host 192.168.109.123
[+] Running 16/0
✔ Container oia-cfx-rda-reports-registry-1 Running 0.0s
✔ Container oia-cfx-rda-event-consumer-1 Running 0.0s
✔ Container oia-cfx-rda-collaboration-1 Running 0.0s
✔ Container oia-cfx-rda-configuration-service-1 Running 0.0s
✔ Container oia-cfx-rda-webhook-server-1 Running 0.0s
✔ Container oia-cfx-rda-alert-correlator-1 Running 0.0s
✔ Container oia-cfx-rda-notification-service-1 Running 0.0s
✔ Container oia-cfx-rda-ingestion-tracker-1 Running 0.0s
✔ Container oia-cfx-rda-irm-service-1 Running 0.0s
✔ Container oia-cfx-rda-alert-processor-1 Running 0.0s
✔ Container oia-cfx-rda-smtp-server-1 Running 0.0s
✔ Container oia-cfx-rda-alert-ingester-1 Running 0.0s
✔ Container oia-cfx-rda-app-controller-1 Running 0.0s
✔ Container oia-cfx-rda-file-browser-1 Running 0.0s
✔ Container oia-cfx-rda-alert-processor-companion-1 Running 0.0s
✔ Container oia-cfx-rda-ml-config-1 Running 0.0s
2026-08-06 09:23:23,333 [rdaf.cmd.zfs] INFO - No compose file found for rda_event_gateway - skipping
2026-08-06 09:23:23,334 [rdaf.cmd.zfs] INFO - No hosts configured for rda_bulk_stats - skipping
2026-08-06 09:23:23,334 [rdaf.cmd.zfs] INFO - No hosts configured for rda_file_object - skipping
2026-08-06 09:23:23,334 [rdaf.cmd.zfs] INFO - Snapshot restore complete — all services are up.
9. OIA Webhook Alert Endpoints
9.1 Overview
OIA Alert Notifications can be delivered to external systems through Webhook Alert Endpoints. In a Geo-DR deployment, webhook connectivity must remain available regardless of whether the Primary or Secondary site is active.
To avoid manual reconfiguration of webhook endpoints after every failover or failback event, it is recommended to use a Fully Qualified Domain Name (FQDN) instead of directly configuring Portal IP addresses.
9.2 DNS Configuration Requirements
When deploying RDAF with ZFS Geo-DR, administrators should configure a DNS entry for the OIA Portal endpoint.
The DNS record should always point to the currently active Portal VIP.
| Site | Portal VIP |
|---|---|
| Primary Site | 192.168.107.229 |
| Secondary Site | 192.168.107.238 |
9.3 Initial Deployment
During normal operations:
- Create a DNS A-record for the OIA Portal FQDN.
- Point the FQDN to the Primary Site Portal VIP.
- Configure all OIA Webhook Alert Endpoints using the FQDN instead of the Portal IP address.
| Recommendation | Webhook Endpoint |
|---|---|
| Recommended | https://oia.company.com |
| Not Recommended | https://192.168.107.229 |
9.4 Failover Procedure
After a successful Geo-DR failover:
- Perform the standard Geo-DR failover procedure.
- Update the DNS A-record to point the FQDN to the Secondary Site Portal VIP.
- Allow DNS propagation based on the configured DNS TTL.
| Before Failover | After Failover |
|---|---|
| oia.company.com → 192.168.107.229 | oia.company.com → 192.168.107.238 |
Once the DNS update is completed, all configured OIA Webhook Alert Endpoints will continue to function without requiring any changes in OIA.
9.5 Failback Procedure
After failback to the Primary Site:
1. Complete the standard Geo-DR failback procedure.
2. Update the DNS A-record to point the FQDN back to the Primary Site Portal VIP.
| Before Failback | After Failback |
|---|---|
| oia.company.com → 192.168.107.238 | oia.company.com → 192.168.107.229 |
9.6 Benefits of Using FQDN
Using an FQDN for OIA Webhook Alert Endpoints provides the following benefits:
- No webhook endpoint reconfiguration required during failover.
- No webhook endpoint reconfiguration required during failback.
- Reduced operational effort during disaster recovery events.
- Consistent endpoint configuration across Primary and Secondary sites.
- Improved business continuity for external alert integrations.
- Reduced risk of missed alerts during DR events.
9.7 Important Considerations
Important
-
If webhook endpoints are configured using direct Portal IP addresses instead of an FQDN, administrators must manually update the webhook endpoint configuration after every failover and failback operation.
-
Failure to update the endpoint configuration may result in webhook notifications being sent to an unavailable Portal IP, causing alert delivery failures.
Recommended Approach
- Webhook Endpoint → FQDN → DNS → Active Portal VIP
This approach ensures seamless webhook operation across both Primary and Secondary sites with minimal administrative effort during disaster recovery activities.
10. Troubleshooting
The following topics cover common issues you may encounter during setup, replication, or failover.
| Issue | Description |
|---|---|
| SSH Issues | Connection failures between primary and secondary nodes. Check SSH key permissions, firewall rules, and ensure that the rdauser account is properly configured on both sites. |
| Syncoid Issues | Problems with the Syncoid replication tool. Verify that Syncoid is installed (which syncoid) and that the ZFS pools are correctly named on both sites. |
| Replication Failures | Snapshot send/receive errors. Check rdaf zfs replication-status for details and review system logs for underlying ZFS or network errors. |
| Rollback | If a failover or configuration change needs to be reversed, use ZFS rollback capabilities to restore a previous snapshot state. |
| MariaDB Recovery | For database-level issues on either site, refer to MariaDB cluster recovery procedures to restore Galera cluster quorum. |
| DR Reset | To fully reset the Disaster Recovery configuration and start fresh, use the appropriate RDAF CLI reset commands. Contact support for guidance if needed. |
10.1 Failure During ZFS Failover
If user encounters the following error while running the rdaf zfs failover command.
+---------------------+---------------------------+--------+-----------------------------+-----------------+--------------+
| mariadb             | Port Connection           | OK     | N/A                         | 192.168.107.236 | 53fda8af248d |
| opensearch          | Service Status            | Failed | HTTPSConnectionPool(host='1 | 192.168.107.234 | 0e995ae3b923 |
|                     |                           |        | 0.95.107.234', port=9200):  |                 |              |
|                     |                           |        | Max retries exceeded with   |                 |              |
|                     |                           |        | url: /_cluster/stats        |                 |              |
|                     |                           |        | (Caused by NewConnectionErr |                 |              |
|                     |                           |        | or('<urllib3.connection.HTT |                 |              |
|                     |                           |        | PSConnection object at      |                 |              |
|                     |                           |        | 0x7d97d8e241d0>: Failed to  |                 |              |
|                     |                           |        | establish a new connection: |                 |              |
|                     |                           |        | [Errno 111] Connection      |                 |              |
|                     |                           |        | refused'))                  |                 |              |
| opensearch          | Firewall Port             | OK     | N/A                         | 192.168.107.234 | 0e995ae3b923 |
| opensearch          | Port Connection           | Failed | TCP Check Failed on ports   | 192.168.107.234 | 0e995ae3b923 |
|                     |                           |        | 9200                        |                 |              |
| opensearch          | Service Status            | OK     | N/A                         | 192.168.107.235 | 3238fc487bd3 |
| opensearch          | Firewall Port             | OK     | N/A                         | 192.168.107.235 | 3238fc487bd3 |
| opensearch          | Port Connection           | OK     | N/A                         | 192.168.107.235 | 3238fc487bd3 |
| opensearch          | Service Status            | OK     | N/A                         | 192.168.107.236 | 510d2aa264e7 |
| opensearch          | Firewall Port             | OK     | N/A                         | 192.168.107.236 | 510d2aa264e7 |
| opensearch          | Port Connection           | OK     | N/A                         | 192.168.107.236 | 510d2aa264e7 |
| kafka               | Service Status            | Failed | NoBrokersAvailable          | 192.168.107.234 | 8dd39bf7dc84 |
| kafka               | Firewall Port             | OK     | N/A                         | 192.168.107.234 | 8dd39bf7dc84 |
| kafka               | Port Connection           | Failed | TCP Check Failed on ports   | 192.168.107.234 | 8dd39bf7dc84 |
|                     |                           |        | 9092,9093                   |                 |              |
| kafka               | Service Status            | OK     | N/A                         | 192.168.107.235 | e6bfbce94c0e |
| kafka               | Firewall Port             | OK     | N/A                         | 192.168.107.235 | e6bfbce94c0e |
| kafka               | Port Connection           | OK     | N/A                         | 192.168.107.235 | e6bfbce94c0e |
| kafka               | Service Status            | OK     | N/A                         | 192.168.107.236 | b5442f81aa29 |
| kafka               | Firewall Port             | OK     | N/A                         | 192.168.107.236 | b5442f81aa29 |
| kafka               | Port Connection           | OK     | N/A                         | 192.168.107.236 | b5442f81aa29 |
| graphdb             | Service Status            | OK     | N/A                         | 192.168.107.234 | 499cfe5aefbd |
| graphdb             | Firewall Port             | OK     | N/A                         | 192.168.107.234 | 499cfe5aefbd |
| graphdb             | Port Connection           | OK     | N/A                         | 192.168.107.234 | 499cfe5aefbd |
| graphdb             | Service Status            | OK     | N/A                         | 192.168.107.235 | 3e3b49cd628b |
| graphdb             | Firewall Port             | OK     | N/A                         | 192.168.107.235 | 3e3b49cd628b |
| graphdb             | Port Connection           | OK     | N/A                         | 192.168.107.235 | 3e3b49cd628b |
| graphdb             | Service Status            | OK     | N/A                         | 192.168.107.236 | 37e0802d1e1e |
| graphdb             | Firewall Port             | OK     | N/A                         | 192.168.107.236 | 37e0802d1e1e |
| graphdb             | Port Connection           | OK     | N/A                         | 192.168.107.236 | 37e0802d1e1e |
| haproxy             | Service Status            | OK     | N/A                         | 192.168.107.234 | d3d668418517 |
| haproxy             | Firewall Port             | OK     | N/A                         | 192.168.107.234 | d3d668418517 |
| haproxy             | Port Connection           | OK     | N/A                         | 192.168.107.234 | d3d668418517 |
| haproxy             | Service Status            | OK     | N/A                         | 192.168.107.235 | 01ebc50ee0c3 |
| haproxy             | Firewall Port             | OK     | N/A                         | 192.168.107.235 | 01ebc50ee0c3 |
| haproxy             | Port Connection           | OK     | N/A                         | 192.168.107.235 | 01ebc50ee0c3 |
| keepalived          | Service Status            | OK     | N/A                         | 192.168.107.234 | N/A          |
| keepalived          | Service Status            | OK     | N/A                         | 192.168.107.235 | N/A          |
| mariadb             | wsrep_local_state_comment | OK     | Synced                      | 192.168.107.234 | N/A          |
| mariadb             | wsrep_cluster_size        | OK     | 3/3                         | 192.168.107.234 | N/A          |
| opensearch          | Cluster Health            | OK     | cluster health is yellow    | 192.168.107.234 | N/A          |
| opensearch_external | Cluster Health            | OK     | cluster health is yellow    | 192.168.125.43    | N/A          |
| minio               | Nodes                     | OK     | 4/4 nodes online            | 192.168.107.234 | N/A          |
| minio               | Disks                     | OK     | 4/4 disks online            | 192.168.107.234 | N/A          |
+---------------------+---------------------------+--------+-----------------------------+-----------------+--------------+
Failover infra health checks failed: Infra component health checks failed: opensearch on 192.168.107.234: HTTPSConnectionPool(host='192.168.107.234', port=9200): Max retries exceeded with url: /_cluster/stats (Caused by NewConnectionError('<urllib3.connection.HTTPSConnection object at 0x7d97d8e241d0>: Failed to establish a new connection: [Errno 111] Connection refused')); opensearch TCP ports on 192.168.107.234: TCP Check Failed on ports 9200; kafka on 192.168.107.234: NoBrokersAvailable; kafka TCP ports on 192.168.107.234: TCP Check Failed on ports 9092,9093
Workaround
Run the infrastructure health check to verify that all infrastructure services are healthy using the below given command.
+------------+-----------------+--------+-----------------------------+---------------+----------------+
| Name       | Check           | Status | Reason                      | Host          | Container Id   |
+------------+-----------------+--------+-----------------------------+---------------+----------------+
| nats       | Port Connection | OK     | N/A                         | 192.168.107.234 | 3d76d3647755 |
| nats       | Service Status  | OK     | N/A                         | 192.168.107.234 | 3d76d3647755 |
| nats       | Firewall Port   | OK     | N/A                         | 192.168.107.234 | 3d76d3647755 |
| nats       | Port Connection | OK     | N/A                         | 192.168.107.235 | a214448f27af |
| nats       | Service Status  | OK     | N/A                         | 192.168.107.235 | a214448f27af |
| nats       | Firewall Port   | OK     | N/A                         | 192.168.107.235 | a214448f27af |
| minio      | Port Connection | OK     | N/A                         | 192.168.107.234 | 12ebbbfdcde1 |
| minio      | Service Status  | OK     | N/A                         | 192.168.107.234 | 12ebbbfdcde1 |
| minio      | Firewall Port   | OK     | N/A                         | 192.168.107.234 | 12ebbbfdcde1 |
| minio      | Port Connection | OK     | N/A                         | 192.168.107.235 | 35bfe39fae42 |
| minio      | Service Status  | OK     | N/A                         | 192.168.107.235 | 35bfe39fae42 |
| minio      | Firewall Port   | OK     | N/A                         | 192.168.107.235 | 35bfe39fae42 |
| minio      | Port Connection | OK     | N/A                         | 192.168.107.236 | e88c42a0b0fa |
| minio      | Service Status  | OK     | N/A                         | 192.168.107.236 | e88c42a0b0fa |
| minio      | Firewall Port   | OK     | N/A                         | 192.168.107.236 | e88c42a0b0fa |
| minio      | Port Connection | OK     | N/A                         | 192.168.107.237 | 9f1dcfe583ca |
| minio      | Service Status  | OK     | N/A                         | 192.168.107.237 | 9f1dcfe583ca |
| minio      | Firewall Port   | OK     | N/A                         | 192.168.107.237 | 9f1dcfe583ca |
| mariadb    | Port Connection | OK     | N/A                         | 192.168.107.234 | 666bcbf98bb3 |
| mariadb    | Service Status  | OK     | N/A                         | 192.168.107.234 | 666bcbf98bb3 |
| mariadb    | Firewall Port   | OK     | N/A                         | 192.168.107.234 | 666bcbf98bb3 |
| mariadb    | Port Connection | OK     | N/A                         | 192.168.107.235 | ae2604718a52 |
| mariadb    | Service Status  | OK     | N/A                         | 192.168.107.235 | ae2604718a52 |
| mariadb    | Firewall Port   | OK     | N/A                         | 192.168.107.235 | ae2604718a52 |
| mariadb    | Port Connection | OK     | N/A                         | 192.168.107.236 | 53fda8af248d |
| mariadb    | Service Status  | OK     | N/A                         | 192.168.107.236 | 53fda8af248d |
| mariadb    | Firewall Port   | OK     | N/A                         | 192.168.107.236 | 53fda8af248d |
| opensearch | Port Connection | OK     | N/A                         | 192.168.107.234 | 0e995ae3b923 |
| opensearch | Service Status  | OK     | N/A                         | 192.168.107.234 | 0e995ae3b923 |
| opensearch | Firewall Port   | OK     | N/A                         | 192.168.107.234 | 0e995ae3b923 |
| opensearch | Port Connection | OK     | N/A                         | 192.168.107.235 | 3238fc487bd3 |
| opensearch | Service Status  | OK     | N/A                         | 192.168.107.235 | 3238fc487bd3 |
| opensearch | Firewall Port   | OK     | N/A                         | 192.168.107.235 | 3238fc487bd3 |
| opensearch | Port Connection | OK     | N/A                         | 192.168.107.236 | 510d2aa264e7 |
| opensearch | Service Status  | OK     | N/A                         | 192.168.107.236 | 510d2aa264e7 |
| opensearch | Firewall Port   | OK     | N/A                         | 192.168.107.236 | 510d2aa264e7 |
| kafka      | Port Connection | OK     | N/A                         | 192.168.107.234 | 8dd39bf7dc84 |
| kafka      | Service Status  | OK     | N/A                         | 192.168.107.234 | 8dd39bf7dc84 |
| kafka      | Firewall Port   | OK     | N/A                         | 192.168.107.234 | 8dd39bf7dc84 |
| kafka      | Port Connection | OK     | N/A                         | 192.168.107.235 | e6bfbce94c0e |
| kafka      | Service Status  | OK     | N/A                         | 192.168.107.235 | e6bfbce94c0e |
| kafka      | Firewall Port   | OK     | N/A                         | 192.168.107.235 | e6bfbce94c0e |
| kafka      | Port Connection | OK     | N/A                         | 192.168.107.236 | b5442f81aa29 |
| kafka      | Service Status  | OK     | N/A                         | 192.168.107.236 | b5442f81aa29 |
| kafka      | Firewall Port   | OK     | N/A                         | 192.168.107.236 | b5442f81aa29 |
| graphdb    | Port Connection | OK     | N/A                         | 192.168.107.234 | 499cfe5aefbd |
| graphdb    | Service Status  | OK     | N/A                         | 192.168.107.234 | 499cfe5aefbd |
| graphdb    | Firewall Port   | OK     | N/A                         | 192.168.107.234 | 499cfe5aefbd |
| graphdb    | Port Connection | OK     | N/A                         | 192.168.107.235 | 3e3b49cd628b |
| graphdb    | Service Status  | OK     | N/A                         | 192.168.107.235 | 3e3b49cd628b |
| graphdb    | Firewall Port   | OK     | N/A                         | 192.168.107.235 | 3e3b49cd628b |
| graphdb    | Port Connection | OK     | N/A                         | 192.168.107.236 | 37e0802d1e1e |
| graphdb    | Service Status  | OK     | N/A                         | 192.168.107.236 | 37e0802d1e1e |
| graphdb    | Firewall Port   | OK     | N/A                         | 192.168.107.236 | 37e0802d1e1e |
| haproxy    | Port Connection | OK     | N/A                         | 192.168.107.234 | d3d668418517 |
| haproxy    | Service Status  | OK     | N/A                         | 192.168.107.234 | d3d668418517 |
| haproxy    | Firewall Port   | OK     | N/A                         | 192.168.107.234 | d3d668418517 |
| haproxy    | Port Connection | OK     | N/A                         | 192.168.107.235 | 01ebc50ee0c3 |
| haproxy    | Service Status  | OK     | N/A                         | 192.168.107.235 | 01ebc50ee0c3 |
| haproxy    | Firewall Port   | OK     | N/A                         | 192.168.107.235 | 01ebc50ee0c3 |
| keepalived | Service Status  | OK     | N/A                         | 192.168.107.234 | N/A          |
| keepalived | Service Status  | OK     | N/A                         | 192.168.107.235 | N/A          |
| portal     | Port Connection | Failed | TCP Check Failed on ports   | 192.168.107.234 | N/A          |
|            |                 |        | 7780                        |                 |              |
| portal     | Service Status  | Failed | service unavailable         | 192.168.107.234 | N/A          |
| portal     | Firewall Port   | OK     | N/A                         | 192.168.107.234 | N/A          |
| portal     | Port Connection | Failed | TCP Check Failed on ports   | 192.168.107.235 | N/A          |
|            |                 |        | 7780                        |                 |              |
| portal     | Service Status  | Failed | service unavailable         | 192.168.107.235 | N/A          |
| portal     | Firewall Port   | OK     | N/A                         | 192.168.107.235 | N/A          |
+------------+-----------------+--------+-----------------------------+-----------------+--------------+
If the infrastructure health check completes successfully and only the portal service reports a Failed status, user can safely ignore the portal status and proceed with starting the remaining services using the following command.
rdaf platform up && rdaf worker up && rdaf app up && rdaf bulk_stats up && rdaf file_object up && rdaf event_gateway up
10.2 MinIO ZFS Replication – Troubleshooting
Symptom
During ZFS replication or initial seeding of the minio-data dataset, replication fails with the following error
full send of minio-data@init estimated size is 29.7G

total estimated size is 29.7G

cannot unmount '/minio-data': pool or dataset is busy

Command execution failed
This error indicates that the /minio-data ZFS dataset is busy because it is being used by a running process or container.
Resolution
Step 1. Verify the Secondary VM is in the expected state
Before troubleshooting the /minio-data dataset, make sure all containers on the Secondary VM are in the down state.
Run the following command from the Secondary RDAF CLI:
Proceed only when all containers are down and the rdaf status output shows Not Provisioned.
Step 2. Login to the target/secondary VM
Login to the secondary node where /minio-data is mounted, Use the following command.
Step 3. Check the process using /minio-data
Use the following command to identify any process currently using the
/minio-data filesystem
Note
If the command returns a PID, proceed to the next step to identify the process.
Step 4. Identify the PID
Use the following command to get detailed information about the identified process.
Verify that the process can be safely stopped before proceeding.
Step 5. Terminate the process
If the process is confirmed as safe to terminate, first try to stop it gracefully using.
Wait a few seconds and verify whether the process is still using /minio-data
If the process is still running and it is safe to terminate it, use
Important
Do not use kill -9 without first identifying the process. Take particular care if the process belongs to MinIO, MariaDB, OpenSearch, GraphDB, Kafka, or another RDAF component.
Step 6. Verify That /minio-data Is No Longer Being Used
Use the following command to verify that no process is using the /minio-data filesystem.
You can also use the following command for additional verification.
Proceed to the next step only after confirming that /minio-data is no longer being used.
Step 7. Retry ZFS setup
After confirming that the /minio-data filesystem is no longer busy, retry the ZFS setup operation using the following command.
rdaf zfs setup \
  --secondary-cfg /home/rdauser/secondary.cfg \
  --ssh-password <password> \
  --interval-minutes <minutes>
Note
The ZFS setup should proceed without the pool or dataset is busy error.
10.3 OpenSearch UNASSIGNED Shards After Snapshot Restore
Symptom
After running rdaf zfs snapshot-restore, the OpenSearch cluster recovers but one or more shards remain in the UNASSIGNED state.
To verify whether any shards are unassigned use the following command.
curl -s -u <username>:<password> --insecure \
"https://<cluster-manager>:9200/_cat/shards?v" | grep UNASSIGNED
For HA deployments, recovery is not complete until all shards are assigned.
Resolution
Step 1 – Verify Cluster Health
Expected after recovery
| Property | Expected Value |
|---|---|
| Status | GREEN |
| unassigned_shards | 0 |
Step 2 – Verify UNASSIGNED Shards
curl -s -u <username>:<password> --insecure \
"https://<cluster-manager>:9200/_cat/shards?v" | grep UNASSIGNED
If any shards are returned, continue with the following steps.
Step 3 – Explain Allocation Failure
curl -k -u <username>:<password> \
-XGET "https://<cluster-manager>:9200/_cluster/allocation/explain?pretty"
Review the allocation explanation to identify the reason for the shard remaining unassigned.
Step 4 – Review OpenSearch Logs
Check for:
- Translog corruption
- Recovery failures
- Missing shard copies
- Disk watermark exceeded
- Node join failures
Step 5 – Roll Back to an Earlier Snapshot
If the latest snapshot cannot recover the affected shards, list the available snapshots:
Identify an earlier OpenSearch snapshot that was created before the issue occurred.
Perform a rollback using the selected snapshot:
After the rollback completes, verify:
and
curl -s -u <username>:<password> --insecure \
"https://<cluster-manager>:9200/_cat/shards?v" | grep UNASSIGNED
Acceptance Criteria
Recovery is successful only when:
- Cluster health is GREEN
- All cluster nodes have joined
unassigned_shards = 0- No PRIMARY or REPLICA shards are UNASSIGNED
- No shard recovery is in progress
- All indices are available
Recommendation
By default, the rdaf zfs snapshot-restore operation restores the latest available snapshot for each service.
If the latest OpenSearch snapshot results in persistent UNASSIGNED shards or shard recovery failures, perform a service-specific rollback using an earlier healthy OpenSearch snapshot using the following command.
Use rdaf zfs list-snapshots to identify the available snapshots. Begin with the most recent healthy snapshot and roll back to older snapshots only if the issue persists.
Root Cause
In some cases, the most recent snapshot may have been captured while shard recovery was still in progress or may contain inconsistent shard metadata. As a result, the restored OpenSearch cluster may be unable to allocate one or more shards, leaving them in the UNASSIGNED state.
Rolling back to an earlier healthy and consistent snapshot can restore proper shard allocation and allow the cluster to return to a GREEN state.
10.4 OpenSearch HA Cluster Troubleshooting Guide
Symptom
After executing the following restore command.
Note
Verify the OpenSearch cluster health. If you observe either of the following, then the cluster has not recovered successfully.
or
In an HA deployment, the expected cluster health is GREEN. Any RED, YELLOW, or UNASSIGNED primary shards should be investigated and resolved.
Expected Health
Run the following command to verify the cluster health.
{
  "status": "green",
  "number_of_nodes": 3,
  "active_primary_shards": <value>,
  "unassigned_shards": 0
}
Verify Cluster Nodes
Verify that all expected nodes have joined the cluster using the following command.
Ensure all expected nodes are present and in the cluster.
Check Unassigned Shards
Run the following command
curl -k -u <username>:<password> \
"https://<cluster-manager-ip>:9200/_cat/shards?v" | grep UNASSIGNED
If any shards are listed as UNASSIGNED, determine the reason before proceeding.
Explain Allocation Failure
To determine why shard allocation failed, use the following command
curl -k -u <username>:<password> \
-X GET "https://<cluster-manager-ip>:9200/_cluster/allocation/explain?pretty"
Typical causes include:
- Node still starting.
- Disk watermark exceeded.
- Shard allocation disabled.
- Corrupted shard/translog.
- Missing node.
- Insufficient replicas.
Verify Recovery Progress
To monitor shard recovery progress, use the following command.
Wait until all shard recoveries have completed before checking the cluster health again
Verify Cluster Settings
To verify the cluster settings, use the following command.
curl -k -u <username>:<password> \
https://<cluster-manager-ip>:9200/_cluster/settings?include_defaults=true
Confirm that shard allocation is enabled.
Verify OpenSearch Logs
To review the OpenSearch logs, use the following command.
Check for the following errors:
- Shard allocation failures.
- Translog corruption.
- Disk watermark errors.
- Bootstrap failures.
- Node join failures.
Resolution
If startup is still in progress, wait for all nodes to finish joining the cluster and shard recovery to complete.
If shards remain UNASSIGNED:
1. Run _cluster/allocation/explain.
2. Resolve the reported issue (disk space, missing node, corruption, allocation settings).
3. Retry shard allocation if appropriate.
4. To verify the cluster health, use the following command:
The cluster is considered healthy when:
- Cluster status: GREEN
- All nodes joined
- unassigned_shards = 0
- No initializing or relocating shards
- All primary and replica shards active
Root Cause
Immediately after snapshot restore, OpenSearch nodes may still be starting and recovering shards. During this period, health checks can temporarily fail with connection errors or report RED/YELLOW status.
For an HA deployment, the recovery is considered complete only when:
- Every cluster node has joined.
- All primary and replica shards are allocated.
- There are no UNASSIGNED shards.
- Cluster health is GREEN.
10.5 MinIO Troubleshooting Guide After Snapshot Restore
Symptom
After executing the following command
Note
After the restore completes, the post-restore health check may report one of the following:
or
This typically indicates that MinIO is still initializing and is not yet ready to serve requests.
Resolution
If MinIO is still initializing, wait 10–30 seconds for the startup process to complete before rerunning the health checks.
Verify Live Health
To verify the MinIO live health status, use the following command.
Verify Cluster Health
To verify the MinIO cluster health, use the following command.
For an HA deployment, all MinIO nodes must be online, and the cluster health endpoint should return HTTP 200 OK.
Verify Container
To verify that the MinIO container is running, use the following command
Verify TCP Port
To verify that port 9000 is reachable, use the following command.
Verify Nodes and Disks
Run the RDAF health check or the MinIO administrative command.
Expected State
- All MinIO nodes are online.
- All disks are online.
- No degraded drives are reported.
- Read/write quorum is available.
For HA Deployments:
- Online Nodes = Configured Nodes.
- Online Disks = Configured Disks.
Verify Logs
To review the MinIO logs, use the following command
Check for the following errors
- Disk initialization failures.
- Drive offline errors.
- Erasure set recovery.
- Quorum failures.
- Network connectivity issues.
Acceptance Criteria
Snapshot restore is successful only when
- MinIO Live Health returns HTTP 200 OK.
- MinIO Cluster Health returns HTTP 200 OK.
- All MinIO nodes are online.
- All disks are online.
- Port 9000 is reachable.
- No read/write quorum errors are present.
Root Cause
Immediately after a snapshot restore, the MinIO container is recreated and storage metadata is reloaded. During this initialization period, the health endpoints and TCP port 9000 may not be immediately available.
As a result, temporary failures such as
Can occur if health checks execute before initialization completes. Once startup finishes, the live and cluster health endpoints return HTTP 200 OK, and all nodes and disks should report online.
10.6 MariaDB Health Check Failed After Snapshot Restore
Symptom
After executing the following command.
The restore completes, but the post-restore health check reports.
Failover infra health checks failed

MariaDB:
ERROR 2003 (HY000):
Can't connect to MySQL server on '<node-ip>:3306'
This typically indicates that the MariaDB container has started but is still initializing and is not yet ready to accept client connections.
Resolution
If MariaDB is still initializing, wait 30–60 seconds for the startup process to complete before rerunning the health checks.
Then verify connectivity using the MySQL client.
Standalone MariaDB
To verify connectivity to a standalone MariaDB instance, use the following command.
Expected output:
MariaDB Cluster (Galera)
To verify that the MariaDB node has successfully joined the Galera cluster, use the following command.
mysql -u<username> -p<password> \
-h <node-ip> \
-P 3306 \
-e "SHOW STATUS LIKE 'wsrep_local_state_comment';"
+---------------------------+--------+
| Variable_name             | Value  |
+---------------------------+--------+
| wsrep_local_state_comment | Synced |
+---------------------------+--------+
Verify TCP Port
To verify that port 3306 is reachable, use one of the following commands.
or
Verify Container Status
To verify that the MariaDB container is running, use the following command.
Verify MariaDB Logs
To review the MariaDB container logs, use the following command.
Review the logs for startup failures, recovery errors, or database corruption.
Check for the following errors:
- Database startup failures.
- Crash recovery failures.
- Storage engine initialization errors.
- Galera cluster join failures (HA deployments).
- Database corruption or InnoDB recovery errors.
Acceptance Criteria
The snapshot restore is considered successful only when:
- The MariaDB container is running.
- Port 3306 is reachable.
- The MySQL client successfully connects to the database.
- For Galera deployments, the node state is Synced.
- No startup or recovery errors are reported in the MariaDB logs.
Root Cause
Immediately after a snapshot restore, the MariaDB container is recreated and the database begins its startup sequence. During this period, MariaDB performs crash recovery, initializes its storage engine, and prepares to accept client connections.
As a result, temporary failures such as:
This is typically a transient condition and resolves once MariaDB finishes starting.
Recovery is complete only when:
- The MariaDB container is running.
- Port 3306 is reachable.
- Client connections are accepted successfully.
- For Galera deployments, the node state is Synced.